Showing posts with label seamstress. Show all posts

Textile Tuesdays Present: Seersucker

Tuesday, July 13, 2010


With this wonderful heat wave that has swept through New York this past week, my mind couldn't help but wonder to the cooler fabrics of summer. One of my personal favorites is seesucker.

Usually made of 100% cotton, this woven sports a rippled or wrinkled appearance making it great for relaxed summer wear. The fabric ripples are created in the weaving process, called slack-tension weave.  The use of tightly woven, heavy-weight warp yarns and loosely woven light-weight weft and warp yarns created the unique texture of seersucker.


The weaving pattern creates a stripped or plaid design in the fabric.  The name seersucker originates from the Persian words for milk and sugar (shir or shekar) in reference to the smooth and bumpy texture. The rippled texture actually keeps the fabric from clinging to the skin and allows air flow between the skin and fabric to keep you nice and cool. Also, since it's already wrinkled, there is no need to iron before wearing, just get up and go. Seersucker is featured in children's clothing, suiting, shirts, skirts, pants, and shorts. 
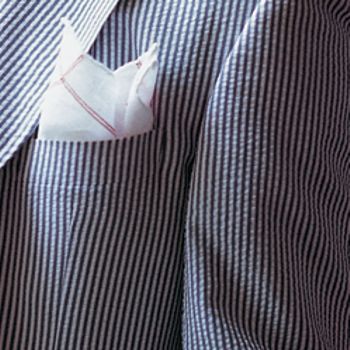
 
So go with the summer time flow and whip up a couple of dresses or skirts to keep you cool this season!

Happy Sewing!
-Katie


Sewing Tools: Rulers

Monday, July 12, 2010


The Ruler Round-up!
3 rulers - 3 brands - 3 uses
 ______________________________

Each ruler has a specific use and works quite well in the mediums they've been designed for. So amp up your crafting with one of these nifty rulers and let the creativity begin!

______________________________

Ruler #1
See-Thru Dressmaker's Ruler
by: Dritz

Great for:
-Taking general measurements and gauging seam allowances
-Measuring and marking placement for buttons, buttonholes
-Measuring and marking spacing for pleats and tucks
-Drawing pattern guidelines-Makes a useful as a guide for rotary cutters

Specifications:
-15 inches long, 4 inches wide
-1/8 inch thick (its heavier weight makes it great for a cutting guide)
-Inches are marked along one side, Centimeters are marked along the other side
-Pre-measured slots run length of ruler to make quick and accurate markings

 ______________________________

Ruler #2
 Acrylic Ruler Coastal Colors
by: Fiskars
 
 Great for:
-Taking general measurements and gauging seam allowances
-Makes a useful as a guide for rotary cutters
-Marking and cutting quilting pieces

Specifications:
-18 inches long, 3 inches wide
-1/8 inch thick (its heavier weight makes it great for a cutting guide, but not too bulky to move around your cutting table easily)
-Marked with 1 inch grid lines and 1/4 inch lines run the length of the ruler (great for measuring quilting pieces)

**I love to use this one for all my rotary cutting needs**

 ______________________________

Ruler #3
B-85 C-Thru Ruler
 
 Great for: 
-Pattern Making
-Drawing accurate straight lines
-Adding seam allowance with ease
-Taking accurate measurements

Specifications: 
-18 inches long, 3 inches wide
-1/8 inch grid lines
-Light weight design (easy to use, portable)

**My all time favorite**


Happy Sewing!
-Katie


Sewing Tips: The Importance of Pressing

Wednesday, July 7, 2010

Below is an excerpt from 150 Sewing Tips by Mary Johnson, printed in Woman's Day in 1962. I found this booklet in my grandmother's sewing library. Reading it not only conjured up memories of my grandmother, but reminded me of the legacy of this crafting tradition.

The Importance of Pressing 

* Good pressing is done slowly with a gliding motion. Don't bear down heavily when pressing seams open or darts flat or you'll get a ridge on the right side. Too much pressure also produces a shine on dark fabrics, flattens napped fabrics, and stretches loosely woven ones.

* Press seams open unless the pattern specifies otherwise. Start at bottom of a seam and work toward top.

* Press vertical darts toward center, underarm and elbow darts with fold down. When working with a heavy fabric, stitch darts, then slash to within about 1/2" of each point and press open.

* You must press as you go, but you don't need to jump up and press each seam the minute it's sewn. Join the parts that make up a unit, make any darts in it, then put it aside and work on another. When all units are prepared, press them before joining them.

* To prevent the topline of the hem from being embossed on the right side, press thoroughly only on the lower half. The upper half is given a once-over-lightly touch-up with a dry iron.

* Never press the bottoms of hems into creases before you hem them.

Sew on people!
Katie

Sewing Tips: Facts about Fabrics

Saturday, July 3, 2010

Below is an excerpt from 150 Sewing Tips by Mary Johnson, printed in Woman's Day in 1962. I found this booklet in my grandmother's sewing library. Reading it not only conjured up memories of my grandmother, but reminded me of the legacy of this crafting tradition.

Facts about Fabrics

* Woolens are the easiest to handle, especially the firmly woven medium weights. They come folded wrong-side out, all ready or the pattern.

* Cottons are the next easiest. They are folded right-side out and when printed, or when the right and wrong sides are different, as in sateen, they must be re-folded wrong-side out, before pinning pattern.

* Tubular jersey and other knits are often manufactured with the right-side out, but sometimes come the other way around, so inspect them carefully before laying out the pattern.

* Some wools have nap, a surface finish on the right side that is smooth to the touch when brushed with the hand one way, rough when brushed the other. Use with nap smooth in a downward direction.

* Some cottons such as corduroy have a pile, smooth to the touch one way, rough the other. The smoothness is usually worn upward for clothing, directed down for household items.

* Synthetics, made in many imitations of natural fabrics, often have a nap or pile too, and they are used in exactly the same way as their natural counterparts are.

* When silk, rayon or synthetic velvet is used for clothing, the pile is usually worn upward for richer color and better wearing quality.  

* With upholstery velvets, the pile is placed downward. The tone is subtler and it is easier to clean.

* Some fabrics must be held taut during stitching, with one hand ahead of the needle, the other behind it. This applies to heavy coatings on which the presser foot tends to move the top layer and cause uneven ends at the bottom of the seam; to plaids so that the lines stay matched; to synthetics and to sheers like organza, no matter what their fiber content, to prevent puckering.
Have more questions about fabric? Stay tuned for Textile Tuesdays where we highlight a different fabric's make and use every week.

Sew on people!
-Katie

Machine Embroidery: Spark Stitch

Friday, July 2, 2010


I found some old sewing notes my grandmother made as she was learning machine embroidery on her Singer.  The complexity of these stitch patterns are amazing! Since her day, the cost to buy embroidered fabric is much lower and as a result the art of enhancing fabric with machine or hand embroidery has somewhat been lost.  So take a sewing lesson from my grandmother, Norma Joy, on the Spark Stitch.

Spark Stitch

Supply List:
-Fine silk or mercerized thread
-Heavy silk or mercerized thread
-Embroidery hoop
-Sewing machine
-Feed plate cover, or machine with feed adjustment

Threading Prep: The Spark Stitch is done with fine silk, or fine mercerized thread on the bobbin and heavy silk or heavy-duty mercerized thread on top.

Machine Prep: The bobbin, or lower tension is loose. The upper tension is normal or slightly tight. The feed of the sewing machine is dropped or a feed cover late is used. Remove the presser foot.

Fabric Prep: The design is stamped or drawn on the right side of the fabric. Place material in hoops. If following a a pattern is preferred select one recommended for braiding


Beginning Stitch: Insert hoops under needle and presser bar. Lower presser bar. Hold end of top thread, lower needle, and draw bobbin thread through to top

Spark Stitch: The work is guided about in an even circular motion while following the design. This is usually freehand work and is done on the right side of the garment.


I feel quite inspired to try this myself on some dish towels, or maybe some old denim cut-offs. It could be quite cute right?

Sew on people!
Katie


Sewing Tips: Your Sewing Machine

Thursday, July 1, 2010

Below is an excerpt from 150 Sewing Tips by Mary Johnson, printed in Woman's Day in 1962. I found this booklet in my grandmother's sewing library. Reading it not only conjured up memories of my grandmother, but reminded me of the legacy of this crafting tradition.

You Sewing Machine

* If the thread breaks when you stitch, the machine is improperly threaded, you've inserted the needle improperly or you are using the wrong make needle.

* If the machine has been unused for some time, oil it in the tiny holes provided for that purpose. Stitch through cotton strips to absorb excess oil.

* Regulate length of machine stitching to suite fabric texture. For heavy coatings, 12 to 13 stitches to the inch; for medium-weight suiting, cotton or synthetics, 14 or 15; for sheers, 16 or 18.

* Use a medium-size machine needle for general garment making.

* If the stitches don't look right, check threading and bobbin. If the trouble still exists, consult the instruction book.

* You can improvise a seam guide with a strip of adhesive tape about 2" long. Place it straight up and down on the machine plate as far right of needle hole as width of seam allowance (usually 5/8"). When you stitch, bring raw edges of fabric up against tape edge.

* If your machine puckers some fabrics take the needle out of the shaft and roll is on fine sandpaper; or sew through the sandpaper without thread (abrasive side up to sand won't get into the works).

* If machine skips stitches on synthetics, especially tricots, change to a fine machine needle and nylon thread.

Let the good times roll and happy sewing!
-Katie


Sewing Tool Roundup!

Thursday, February 18, 2010

Being longtime seamstresses, the team here at SEW Moni has had plenty of chances to thoroughly test some products and have compiled a list of tried and true tools that every seamstress should have in her possession.

Scissors
A good, sharp pair of Fiskars are a must!  The brand has been around for ages, since 1694 to be exact.  Their products are readily available and have great longevity.  Not in the mood to buy another pair, make your well-used scissors like new and have them sharpened for a fraction of the cost.  No wonder they are the world's #1 scissor brand.
Available at Joann Fabrics, Target, Walmart, and just about any sewing supply store.

 
 Magnetic Pin Cushion
My mother introduced me to this wonderful invention, and I haven't used my tomato cushion since.  Not only helpful for keeping your pins organized and at your finger tips, it's perfect for post project clean-ups.  Just a slow sweep across your table, and it picks up any loose pins scattered about.
Grabbit is our brand of choice.
Pick one up at Joann Fabrics.  Sil Thread in the NYC garment district is a great source too.


Seam Ripper
I lovingly call this the "sewing eraser" and it's is a must for pulling out those little mistakes that seem to show up as we are sewing.  They are quite useful for creating machine stitched button holes too!  Seam rippers come in a variety of sizes and shapes.  I find that the one's with the longer handles are easier to control.
Available at Joann Fabrics, Sil Thread and Panda Thread of NYC.

Iron
Voted best iron by the SEW Moni team and prized by our current students, the Rowenta Focus Stainless-Steel Iron gets rid of those pesky wrinkles and presses seams flat with beautiful smoothness and ease.
Pick one up at Target or Joann Fabrics.

 Measuring Tape
Where would pattern making be without measurements?  Keep your sewing accurate with one of these flexible and perfectly portable rulers.
Available at just about any sewing supply store.  


SEW on!
-Katie Mann


Seamstress Blues

Tuesday, October 20, 2009


After reading the "bust" on illegal immigrants working for American Apparel, I was upset. Here is a company who prides themselves on their American Made products while all the while employing illegal immigrants to get the job done. The shear knowledge of their labor force was unsettling to me for 3 few reasons:

A. Employing illegal workers only de-values and contributes to the [already set] low wage movement of workers and production within the crafting industry: carpentry, sewing, sculpting, etc.

B. Illegal immigrant employment does not allow for those who are legal to move forward.

C. Why aren't we spending money to teach sewing or crafting in primary education through home economics classes?

Sewing is dear to my heart and everything involving it's process is sincere. Sewing takes time, it's labor intensive and requires a keen eye. Taking pieces of fabric, cutting to speck and ultimately constructing something flat into form is magical.

I understand that at the end of the day a business has to make money. This is America and capitalism is the game. But at what cost and exploitation? If continually employing illegal immigrants becomes the standard, then we are only moving backwards.

I'm proud to note that our little company has legal workers. We are few but hope to be many. And while our business goals may be capitalist in nature, we are not in the market of exploitation.  Let us sew like the wind and build a thriving sewing circle to match!

XO

Moni

ShareThis

Proudly designed by Mlekoshi playground